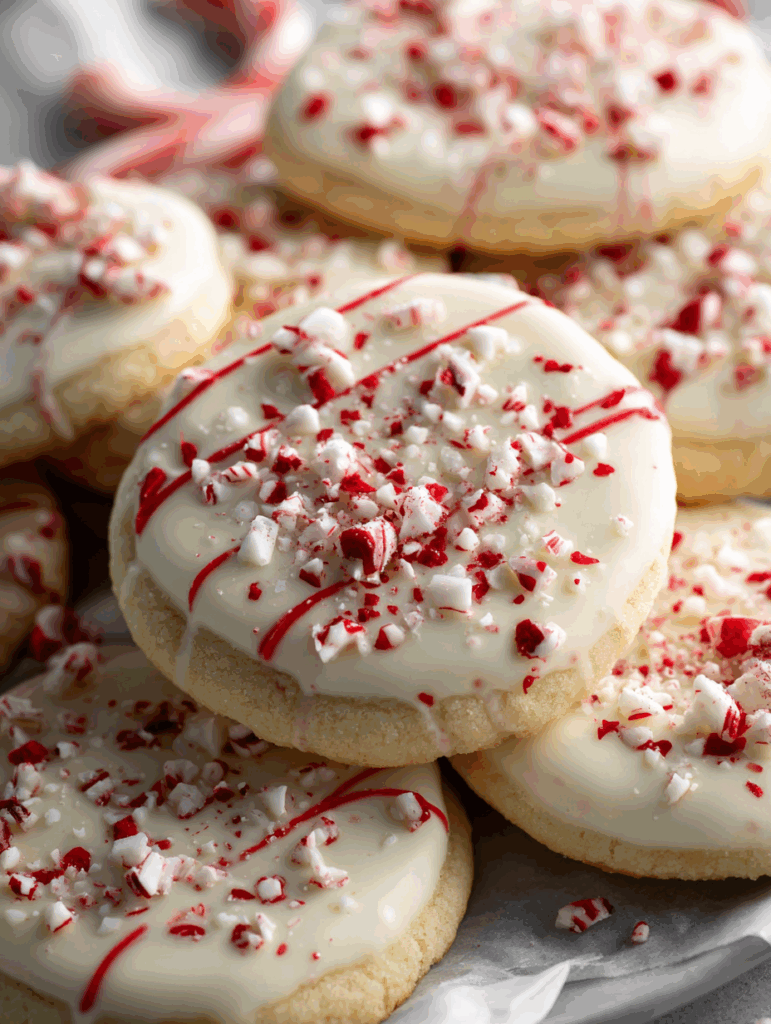
Transform your holiday baking with these irresistible White Chocolate Dipped Peppermint Sugar Cookies that combine the classic comfort of buttery sugar cookies with the festive flavors of peppermint and creamy white chocolate. These elegant treats are perfect for cookie exchanges, holiday parties, or simply enjoying with a warm cup of cocoa by the fireplace.
Why You’ll Love This Recipe
These White Chocolate Dipped Peppermint Sugar Cookies deliver the perfect balance of sweet and refreshing flavors that capture the essence of the holiday season. The tender, melt-in-your-mouth sugar cookie base provides a delightful contrast to the smooth white chocolate coating, while the crushed peppermint adds a satisfying crunch and burst of cool mint flavor.
What makes this recipe truly special is its versatility and visual appeal. The cookies are soft and chewy with crisp edges, making them appealing to all texture preferences. The white chocolate dip creates an elegant finish that looks professionally made, while the scattered peppermint pieces add a festive red and white color scheme that’s perfect for any holiday gathering.
These cookies also offer the convenience of make-ahead preparation. You can bake the cookies in advance and dip them closer to serving time, or prepare the entire batch and store them properly for several days. The recipe yields approximately 36 cookies, making it ideal for large gatherings or gift-giving.
Ingredients You’ll Need
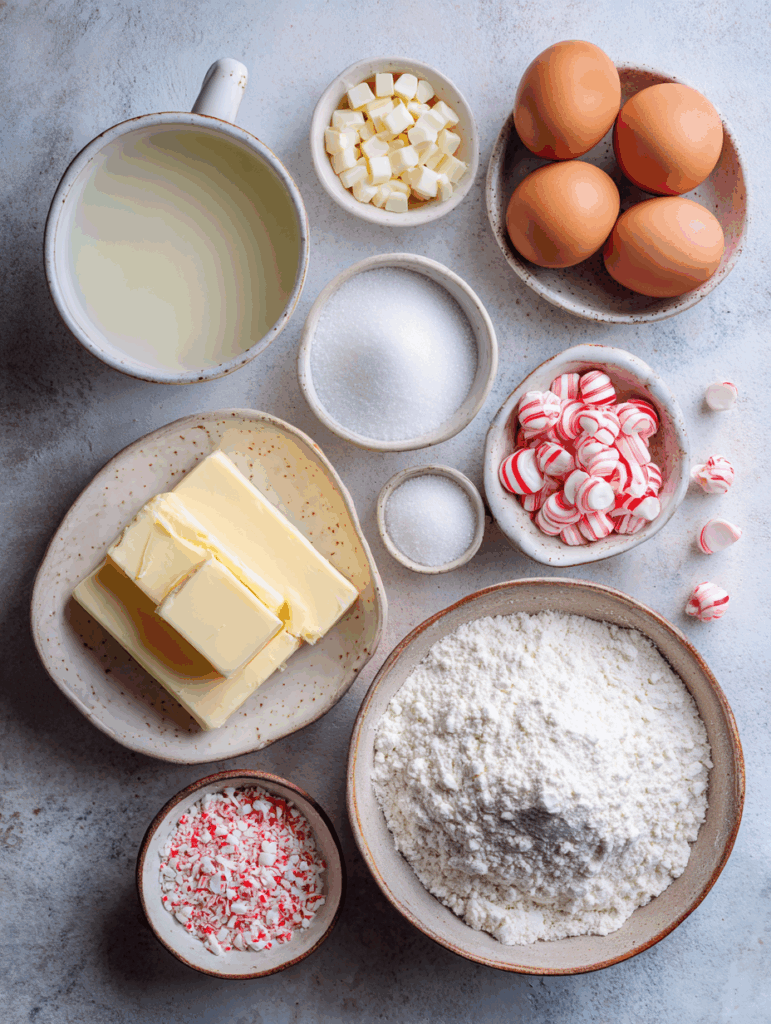
Cookies:
- 1 cup unsalted butter, softened
- 1 cup granulated sugar
- 1 large egg
- 1 1/2 teaspoons vanilla extract
- 1/2 teaspoon peppermint extract
- 2 1/2 cups all-purpose flour
- 1/2 teaspoon baking powder
- 1/4 teaspoon salt
Decoration:
- 8 ounces white chocolate, chopped or chips
- 1/2 cup crushed peppermint candies or candy canes
How to Make White Chocolate Dipped Peppermint Sugar Cookies
Step-by-Step Instructions:
Prepare Your Workspace (10 minutes) Begin by preheating your oven to 350°F (175°C) and line two large baking sheets with parchment paper. Set up your workspace with all ingredients measured and ready. Allow the butter to reach room temperature if you haven’t already, as properly softened butter is crucial for achieving the perfect cookie texture.
Make the Cookie Dough (15 minutes) In a large mixing bowl, cream the softened butter and granulated sugar together using an electric mixer on medium speed for 3-4 minutes until the mixture becomes light and fluffy. This creaming process incorporates air into the dough, creating tender cookies. Beat in the egg, vanilla extract, and peppermint extract until well combined, scraping down the sides of the bowl as needed.
In a separate bowl, whisk together the all-purpose flour, baking powder, and salt. Gradually add the dry ingredients to the butter mixture, mixing on low speed just until the dough comes together. Avoid overmixing, as this can lead to tough cookies.
Shape and Bake the Cookies (20 minutes) Using a cookie scoop or tablespoon, portion the dough into 1.5-inch balls and place them on the prepared baking sheets, spacing them about 2 inches apart to allow for spreading. Gently flatten each ball slightly with your fingers or the bottom of a glass.
Bake for 10-12 minutes, or until the edges are set and lightly golden. The centers should still appear slightly soft. Remove from the oven and let the cookies cool on the baking sheet for 5 minutes before transferring them to a wire rack to cool completely.
Prepare the White Chocolate Dip (10 minutes) While the cookies cool, melt the white chocolate using your preferred method. For the microwave method, place the chopped white chocolate in a microwave-safe bowl and heat in 30-second intervals, stirring between each interval until smooth. For the double boiler method, place the chocolate in a heatproof bowl set over simmering water, stirring until melted and smooth.
Dip and Decorate (15 minutes) Once the cookies are completely cool, dip each cookie halfway into the melted white chocolate, allowing excess chocolate to drip off. Immediately sprinkle the wet chocolate with crushed peppermint candies before the chocolate sets. Place the dipped cookies on a parchment-lined baking sheet and refrigerate for 15-20 minutes to set the chocolate completely.
Helpful Tips
Temperature Control: Ensure your butter is properly softened but not melted. It should give slightly when pressed but still hold its shape. Room temperature ingredients blend more easily and create a smoother dough.
Peppermint Extract Balance: Start with the specified amount of peppermint extract and taste the dough before baking a test cookie. Peppermint extract can vary in strength between brands, so adjust according to your preference for mint flavor intensity.
Chocolate Melting Success: When melting white chocolate, use low heat and stir frequently to prevent scorching. White chocolate is more delicate than dark chocolate and can seize if overheated. If your chocolate becomes too thick for dipping, stir in a teaspoon of coconut oil or shortening to thin it out.
Even Cookie Sizes: Use a cookie scoop for uniform cookies that will bake evenly. If you don’t have a cookie scoop, roll the dough into balls between your palms for consistent sizing.
Peppermint Preparation: Place candy canes or peppermint candies in a sealed plastic bag and crush them with a rolling pin or meat mallet. Aim for pieces that are small enough to stick to the chocolate but large enough to provide texture and visual appeal.
Details
Prep Time: 30 minutes
Bake Time: 10-12 minutes per batch
Cooling Time: 30 minutes
Decorating Time: 20 minutes
Total Time: 1 hour 30 minutes
Yield: 36 cookies
Serving Size: 1 cookie
Nutritional Information (approximate per cookie):
- Calories: 145
- Fat: 6g
- Carbohydrates: 23g
- Protein: 2g
- Sugar: 16g
- Sodium: 45mg
Notes
Flavor Variations: This recipe serves as an excellent base for other flavor combinations. Try substituting the peppermint extract with other extracts like almond, lemon, or orange, and adjust the chocolate and toppings accordingly.
Make-Ahead Options: The cookie dough can be prepared up to 2 days in advance and stored covered in the refrigerator. You can also freeze shaped cookie dough balls for up to 3 months, baking them directly from frozen with an additional 1-2 minutes of baking time.
White Chocolate Quality: Use high-quality white chocolate for the best flavor and melting properties. Look for products that list cocoa butter as the first ingredient rather than those made with vegetable fats.
Decoration Timing: Work quickly when adding the crushed peppermint to the dipped cookies, as white chocolate sets faster than dark chocolate. If needed, you can re-warm the chocolate briefly if it begins to thicken during the dipping process.
Frequently Asked Questions
Can I use salted butter instead of unsalted butter? While unsalted butter is preferred for better control over the salt content, you can substitute salted butter by reducing the added salt in the recipe to 1/8 teaspoon.
What if I don’t have peppermint extract? You can omit the peppermint extract for plain sugar cookies, or substitute with an equal amount of vanilla extract. The peppermint flavor will then come primarily from the crushed candies on top.
Can I make these cookies without the white chocolate dip? Absolutely! These sugar cookies are delicious on their own. You can dust them with powdered sugar, roll them in colored sugar before baking, or leave them plain.
How do I prevent the white chocolate from becoming too thick? Keep the melted chocolate warm during the dipping process. If it thickens, reheat it briefly or stir in a small amount of coconut oil or shortening to restore the proper consistency.
Can I use different types of peppermint candies? Yes, any hard peppermint candies will work. Candy canes, peppermint rounds, or even peppermint bark pieces can be crushed and used as decoration.
Why are my cookies spreading too much during baking? Excessive spreading usually occurs when the butter is too warm, the dough is too warm, or there’s not enough flour. Chill the shaped dough for 15 minutes before baking if this becomes an issue.
Storage Instructions
Room Temperature Storage: Store the completed White Chocolate Dipped Peppermint Sugar Cookies in an airtight container at room temperature for up to one week. Place parchment paper between layers to prevent the cookies from sticking together and to protect the chocolate coating.
Refrigerator Storage: For longer freshness, store the cookies in the refrigerator for up to two weeks. Allow them to come to room temperature before serving for the best texture and flavor.
Freezing Instructions: These cookies freeze beautifully for up to three months. Place them in a single layer on a baking sheet and freeze until solid, then transfer to freezer-safe containers or bags. Thaw at room temperature for about 30 minutes before serving.
Unbaked Dough Storage: The cookie dough can be wrapped tightly and refrigerated for up to 3 days or frozen for up to 3 months. If freezing, shape the dough into balls first, then freeze on a baking sheet before transferring to storage containers.
Separation Prevention: To prevent the peppermint pieces from falling off during storage, ensure the white chocolate has set completely before storing and handle the cookies gently when transferring them.
Conclusion
These White Chocolate Dipped Peppermint Sugar Cookies represent the perfect marriage of classic holiday flavors and elegant presentation. The recipe strikes an ideal balance between accessibility for novice bakers and sophistication that will impress even the most discerning cookie enthusiasts. Each bite delivers the comforting familiarity of a traditional sugar cookie enhanced by the cool freshness of peppermint and the luxurious smoothness of white chocolate.
The beauty of this White Chocolate Dipped Peppermint Sugar Cookies Recipe lies not only in its delicious results but also in its versatility and reliability. Whether you’re preparing treats for a holiday cookie exchange, looking for an impressive dessert for your next gathering, or simply wanting to fill your home with the warm, inviting aromas of holiday baking, these cookies deliver on every front.
The combination of make-ahead friendly preparation, stunning visual appeal, and irresistible flavor makes this recipe a valuable addition to your holiday baking repertoire. These cookies capture the magic of the season in every bite, creating sweet memories that will have family and friends requesting the recipe year after year. With proper storage, you can enjoy these festive treats throughout the holiday season, making them a practical choice for busy schedules while never compromising on taste or presentation.