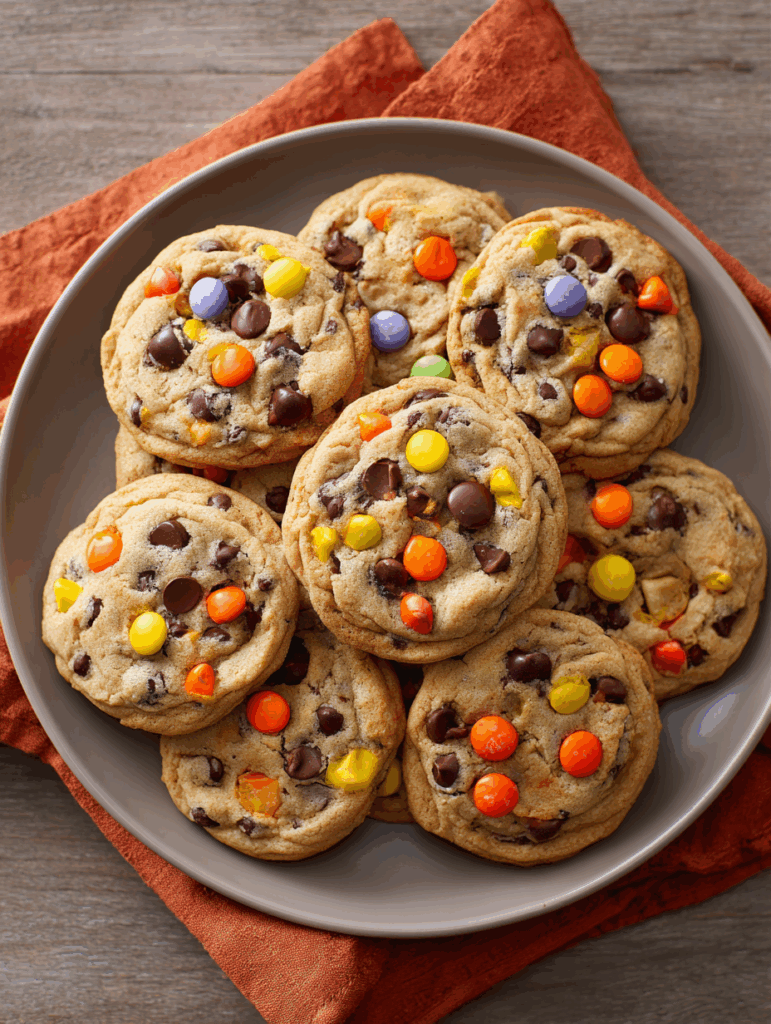
Transform your traditional chocolate chip cookies into spooky Halloween treats with this festive Halloween Chocolate Chip Cookies Recipe! These delightfully chewy cookies combine the classic comfort of chocolate chip cookies with fun Halloween colors and decorations that will enchant both kids and adults alike.
Why You’ll Love This Recipe
This Halloween Chocolate Chip Cookies Recipe brings together the best of both worlds: the timeless appeal of homemade chocolate chip cookies and the excitement of Halloween festivities. The cookies feature a perfectly balanced dough that’s crispy on the edges yet soft and chewy in the center. What makes these cookies truly special is the addition of colorful Halloween candies and decorative elements that create an eye-catching treat perfect for parties, trick-or-treaters, or cozy autumn baking sessions.
The recipe is incredibly versatile, allowing you to customize the decorations based on your preferences or what you have on hand. Whether you’re hosting a Halloween party, need treats for a school event, or simply want to add some seasonal fun to your baking routine, these cookies deliver both visual appeal and delicious flavor that everyone will remember.
Ingredients You’ll Need
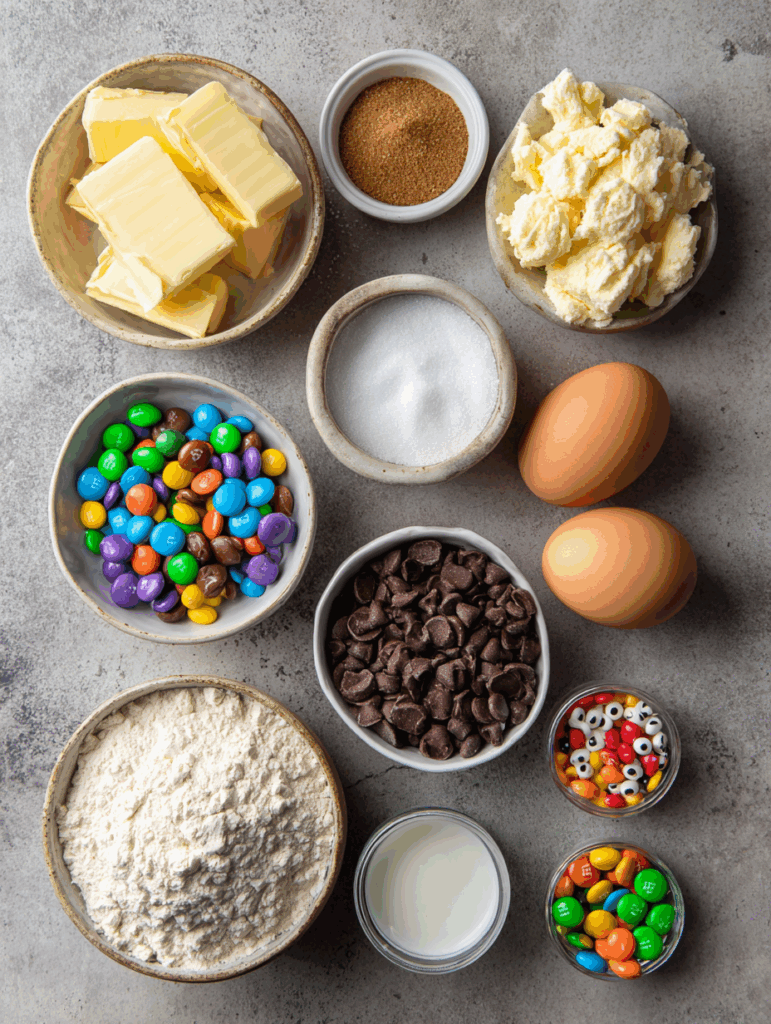
Dough:
- 1 cup unsalted butter (softened)
- 3/4 cup brown sugar (packed)
- 1/2 cup granulated sugar
- 2 large eggs
- 2 teaspoons vanilla extract
- 2 1/4 cups all-purpose flour
- 1 teaspoon baking soda
- 1/2 teaspoon salt
Mix-Ins:
- 1 cup semi-sweet chocolate chips
- 3/4 cup Halloween-colored M&M’s or candy-coated chocolates
- 1/4 cup festive sprinkles (optional)
- Candy eyeballs for decoration (optional)
How to Make Halloween Chocolate Chip Cookies Recipe
Step-by-Step Instructions:
Step 1: Prepare Your Workspace Preheat your oven to 375°F (190°C). Line two large baking sheets with parchment paper or silicone baking mats. This prevents sticking and ensures even browning.
Step 2: Cream Butter and Sugars In a large mixing bowl, cream together the softened butter, brown sugar, and granulated sugar using an electric mixer on medium speed for 2-3 minutes until the mixture is light and fluffy. This step is crucial for achieving the perfect cookie texture.
Step 3: Add Wet Ingredients Beat in the eggs one at a time, ensuring each is fully incorporated before adding the next. Mix in the vanilla extract until well combined.
Step 4: Combine Dry Ingredients In a separate bowl, whisk together the flour, baking soda, and salt. Gradually add this dry mixture to the wet ingredients, mixing on low speed until just combined. Avoid overmixing to prevent tough cookies.
Step 5: Fold in Mix-Ins Using a wooden spoon or rubber spatula, gently fold in the chocolate chips and Halloween-colored candies. Reserve some candies and sprinkles for decorating the tops of cookies before baking.
Step 6: Shape and Decorate Drop rounded tablespoons of dough onto the prepared baking sheets, spacing them about 2 inches apart. Lightly press additional Halloween candies, sprinkles, and candy eyeballs onto the tops of each cookie for extra festive appeal.
Step 7: Bake to Perfection Bake for 9-11 minutes, or until the edges are golden brown but the centers still appear slightly underbaked. The cookies will continue cooking on the hot pan after removal from the oven.
Step 8: Cool and Serve Allow cookies to cool on the baking sheet for 5 minutes before transferring to a wire rack. This prevents breaking and allows them to set properly.
Helpful Tips
Butter Temperature Matters: Ensure your butter is properly softened (room temperature) but not melted. It should give slightly when pressed but still hold its shape. This creates the ideal texture for creaming with sugars.
Don’t Overbake: These cookies continue cooking after removal from the oven due to residual heat. Slightly underbaked centers will result in perfectly chewy cookies once cooled.
Chill the Dough: If your kitchen is warm or the dough seems too soft, refrigerate it for 30 minutes before shaping. This prevents excessive spreading during baking.
Customize Your Colors: Choose Halloween candies in traditional orange, black, and purple, or mix in white and yellow for a broader autumn palette. Mini chocolate chips work well as “dirt” for graveyard-themed cookies.
Even Sizing: Use a cookie scoop or measuring spoon to ensure uniform cookie sizes, which promotes even baking and professional presentation.
Details
Prep Time: 15 minutes
Bake Time: 9-11 minutes per batch
Total Time: 30 minutes
Yield: Approximately 36 cookies
Difficulty Level: Easy
Best Served: Warm or at room temperature
Notes
For extra Halloween flair, consider drizzling cooled cookies with melted white chocolate tinted with orange food coloring, or dust them lightly with edible glitter. Store-bought Halloween cookie decorating kits can also provide additional creative options.
The dough can be prepared up to 24 hours in advance and stored covered in the refrigerator. Simply bring to room temperature before shaping and baking. For a more intense chocolate flavor, substitute dark chocolate chips for semi-sweet varieties.
Frequently Asked Questions
Q: Can I make these cookies ahead of time? A: Absolutely! These Halloween Chocolate Chip Cookies Recipe treats stay fresh for up to one week when stored properly. You can also freeze the baked cookies for up to three months.
Q: What if I can’t find Halloween-colored candies? A: Regular M&M’s work perfectly fine, or you can use any colorful candy-coated chocolates. Orange and black sprinkles can also add Halloween spirit to regular chocolate chip cookies.
Q: Can I freeze the cookie dough? A: Yes! Shape the dough into balls and freeze on a baking sheet. Once solid, transfer to freezer bags. Bake directly from frozen, adding 1-2 extra minutes to the baking time.
Q: How do I prevent cookies from spreading too much? A: Ensure your butter isn’t too warm, chill the dough if needed, and don’t skip the baking soda. Also, make sure your baking sheets aren’t too hot when you place the dough on them.
Q: Can I substitute ingredients? A: While this Halloween Chocolate Chip Cookies Recipe works best as written, you can substitute up to half the all-purpose flour with whole wheat flour, or use coconut oil in place of butter for a different flavor profile.
Storage Instructions
Store your finished Halloween Chocolate Chip Cookies Recipe creations in an airtight container at room temperature for up to one week. Layer cookies between sheets of parchment paper to prevent sticking and maintain their decorative appearance.
For longer storage, freeze cookies in freezer-safe containers for up to three months. Thaw at room temperature for best texture and flavor. Avoid refrigerating these cookies, as this can make them lose their ideal chewy texture.
If you’ve added delicate decorations like candy eyeballs, store cookies in a single layer when possible to prevent decorations from falling off or getting damaged.
Conclusion
This Halloween Chocolate Chip Cookies Recipe transforms an everyday favorite into a festive seasonal treat that captures the magic of Halloween in every bite. The combination of classic chocolate chip cookie comfort with playful Halloween decorations creates treats that are as fun to make as they are to eat.
Whether you’re baking with children, preparing for a Halloween party, or simply want to add some seasonal joy to your kitchen, these cookies deliver both visual impact and delicious taste. The recipe’s flexibility allows for creativity while maintaining the reliable results that make chocolate chip cookies a beloved classic.
Remember that the key to perfect Halloween Chocolate Chip Cookies Recipe success lies in not overbaking and having fun with the decorative elements. Each batch becomes a canvas for creativity, making these cookies not just a treat, but a memorable experience that brings people together during the Halloween season.